[Note to Readers: Our website is huge with the largest collection of rhythm bones information in the world, and it can be overwhelming to a beginner. This is a working draft of a BEGINNER PATH Page and we invite you to test it before it is moved to our Homepage. If you are a beginner, try the Path to see if it works for you, or if you already play and can remember the problems you had as a beginner, help finish the Page by sending us your comments using our “Contact Us” Page.]


Whether you discovered rhythm bones five minutes ago or you’re holding your very first pair, you are in the exact right place. This ancient, simple, and incredibly fun instrument has brought rhythm to cultures all over the world for millennia, and it is far easier to learn than you might think.
We have broken down centuries of knowledge into four simple, bite-sized steps. Follow this path to choose your bones, master your first “clack,” and join a passionate global community keeping this legendary tradition alive. Grab your bones, and let’s get clacking!
Page Contents
Step 1. Discover the Instrument
Rhythm bones are a percussion instrument historically made from animal ribs and also from beautiful hardwoods. Visit our What are Bones Page and then click the Back Button to return.
Step 2. Get Your First Pair
If you go to our ‘Make or Buy’ page it can be overwhelming with all the choices. The following Table may help you make a choice.
| Type | Material | Cost | Comments |
| Wood Shims | Pine, Fir | Under $5 | Absolute Beginner Testing the Water, Hardware Store |
| Domestic Hardwoods | Ash, Maple, Oak, Walnut | $20-?? | Ash a good choice |
| Exotic Woods | Ebony, Rosemary | $40-$60 | Deep, Rich & Resonant, Loud |
| Natural Bone | Cow Ribs | $30-?? | Want the Historical Experience, You Make It |
| Natural Bone | Cow Shin Bone | $30-?? | Clear Sound With no Marrow |
If you want to spend even less, you can also look into do it yourself options. Because rhythm bones originated without much technology, many players still make their own for almost no cost. Check out our Make or Buy Page.
Which material is right for me?
Step 3. Master The Basics
It is time to Master the Basics which are; how to hold them, play a Tap, and play the Triplet using one of the best teaching videos. After the video we will review the steps. It is amazing what you can do with just the basics.
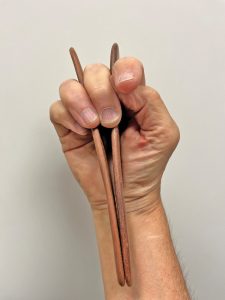
How to Hold – Holding the bones correctly is the key to quickly learning to play rhythm bones. Place the first bone, called the stationary bone, between your index and middle finger with about an inch protruding above your fingers. Hold the bones against the palm of your hand using the middle finger.
Then place another bone, called the movable bone, between the middle and ring finger, also with about an inch protruding above the fingers. Tighten or loosen the pressure of your ring finger until the bone moves freely back and forth. This is one problem area using enough pressure so the bone swings back and forth but doesn’t fall out of your hand. It is difficult because you are using lots of pressure with the middle finger holding the stationary bone and at the same time less pressure holding the movable bone. Shake your hand gently. The moving bone should swing freely and slap against the fixed bone with a clean “clack.”
There are other ways to hold the stationary bone – players with a Celtic background hold the stationary bone between thumb and index finger.
Play a Tap – Your forearm should be horizontal in front of your torso. Bend your wrist so that it forms a right angle with your forearm. Rotate your wrist outward as if you are turning a door knob. When your hand stops rotating, the movable bone strikes the stationary bone producing a single click. Do not try to make the Tap with your fingers as the sound comes entirely from loose wrist rotation. Keep the motion compact, sharp and accurate rather than large and loose.
Play a Double (or duplet) – This builds on the single Tap by utilizing both the forward and backward motion of your wrist. Twist your wrist forward to create the first clack, then instantly snap it back to its starting position to create a second clack. Practice a slow, steady click-click… click-click… click-click… until the two sounds are perfectly even in volume and spacing.
Play the Triplet – The rhythm bones triplet is difficult to describe in words, but builds off the Double. The motion you saw in the video is often described as like washing a window where the motion is a continuous back and forth. There is a slight downward motion as your wrist moves away from the body that provides the momentum for the second click, and the third click happens as your wrist returns to its original position. There are three distinct sounds with each slightly elliptical back and forth movement. If you keep repeating this movement you are playing a triplet roll that sounds like a galloping horse (tri-ple-et, tri-ple-et). A single triplet is actually hard to play. Speed will come naturally once your muscles relax.
So What is Next
Play with both hands. Transfer what you have learned from probably your dominant hand to your non-dominant hand. This should be straight forward except it is your non-dominant hand which makes it a bit harder. Play a pattern like four Taps in your dominant hand, repeat in the non-dominant hand, and then both of them together. One very useful pattern is a Triplet followed by a Tap.
Start with simple songs to smooth out your timing. Try folk or old time to smooth out your triplets. Try Irish reels and jigs to build up speed. For advanced skills try workshops on Latin, jazz, and polyrhythms (found on our ‘Learn to Play Page”).
Drummer’s style. What you have learned so far is the Basic or Traditional style of playing rhythm bones. Think about a drummer who has a drumstick in each hand and makes taps by hitting the drum surface. You can make Taps now, and you can play many of the drum rudiments. Intermediate and Advanced rhythm bones player incorporate both styles into their playing style.
Other resources. Our Learn to Play‘ page with many more resources including workshop videos.
Practice. As with any musical instrument it takes practice to be good. Find music you like and practice. You could be really good in a few months. The Media Exhibit is one of the largest collection of rhythm bones recordings, and you might find something that helps you.
Congratulations, you are now a good rhythm bones player, and it is time to play with live musicians. Look for opportunities to play Watch this video and find something like it in your neighborhood. https://www.youtube.com/watch?v=3REGyohDabc. Remember you are an accompany musician and should blend in with the others, but when it is time for you to take a break, make rhythm bones proud.
Step 4. Connect with the Rhythm Bones Community
Come to a Bones Fest which is described as a family reunion with family you didn’t know you had. Try different rhythm bones at the Bones Marketplace. Attend workshops to learn more technique. Jam with players of all skill levels. It is a non competitive environment and you will feel comfortable performing on stage. Meet some of the nicest people (Click HERE for a profile of many of our members and other players). Click HERE for Highlights from the recent Bones Fest XXX. Click HERE to see highlights from all the Bones Fests. Bones Fest XXXI will likely be in Detroit, MI in 2027.
Our website is the largest source of rhythm bones information in the world with information about playing the instrument and an Online Museum for everything else.
The rhythm Bones Player newsletter has current and historical information and is cataloged and housed in the Library of Congress. Read the latest newsletter with Highlights from Bones Fest XXX.
Join the Rhythm Bones Society and help us share our unique instrument with the world.